So do you think you’ll keep biking? Maybe it’s time to find a new hobby. eh?
Those are just a few of the comments that I have heard in the last two months. But let me assure you, I won’t be hanging up the helmet anytime soon.
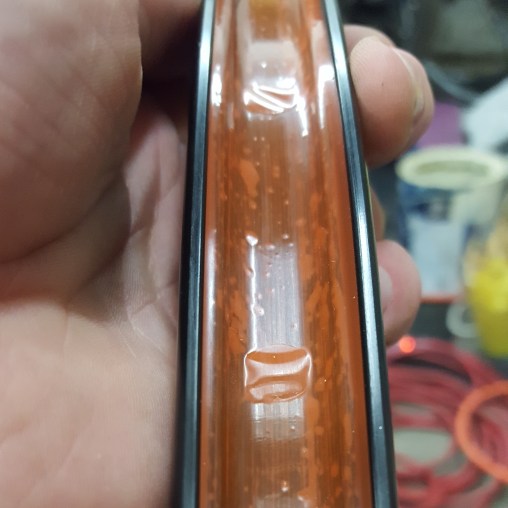
Alright, let me back up a bit. Two months ago, took a bit of a tumble.
A friend and I had headed to Joyride 150 to get a bit of a mid winter mountain biking fix. Unfortunately, the day did not end with chilled beer and some tacos like all rides should, but with a ride in the back of an ambulance and a plaster cast. I don’t exactly remember what happened, but the gist of it is I did something that ended with a science experiment of “What material is stronger, concrete or bone?” (spoiler alert, it isn’t bone). One surgery and now many sessions of physio later, things are starting to get back to normal.
Some might think that a situation like this would make me second guess the sport I love, but that is not the case.
See, things can happen no matter what you are doing with your life. The weekend that I broke my elbow was also the same weekend as one of the iciest days we had all winter. So the other people in the fracture clinic had just been walking to and from their car, or walking down the street. I guess what I’m trying to say is that there is no avoiding injuries no matter what you do. So why not live you life in the way you enjoy most?
So yes, I am going to keep biking. And no, I am not going to let this injury hold me back. I’m already planning the next bike trips and what events I want to try.
P.S. Curious what a broken elbow looks like? Take a look!
Sing it with me: “I would drive 950 km, just to drive 950 more. Just to be the guy who drove 1900 kilometres to ride for (not quite) 34.” Not quite as catchy as the original, is it? Plus, I only really rode about 31km.
For those of you who don’t know, Mont Saint Anne is a gorgeous resort area just outside of Quebec City in Beaupré. It is also the only North American stop for the UCI Mountainbike World Cup (Take that Whistler!). The resort boasts both 110 km of cross country trails and 25 km of downhill trails served by a single lift. My goal was to get at least a small taste of what they had to offer.
Early on a Sunday morning, I packed my car full of all the gear, gadgets, and snacks I could fit and set off on the 10-hour drive. After a surprisingly small number of coffee breaks, I arrived in Mont-Sainte-Anne just in time to see the sunset. I checked into my hotel and tried to get some rest so I could hit as many trails as possible the next morning.
It is amazing how easy it is to wake up when you actually want to be doing something! I started the coffee maker and started chowing down on a very nutritious breakfast while reviewing the massive map I had picked up the night before.
Danish and some light reading
After stuffing my face with way too many danishes, I rode over to the main office and picked up my trail pass. The attendant in the office recommended I start with La Boutteaboutte, so off I headed to get started. Or so I thought, turns out I had barely even started and I was already lost. While the trails are well marked, for the most part, I seemed to have trouble navigating them and this would just be the first of many times I had to pull out the map.
La Boutteaboutte turned out to be a massive challenge for my legs. The mixture of not being used to climbs that last longer than 100 metres and the fact that it had poured rain the night before turning parts of the trail to mud bogs ensured that I was in the pain cave as soon as I started riding. The whole climb up, I kept thinking about how much more fun it would be to ride it back down. So that’s exactly what I did, instead of climbing more.
The descent of La Boutteaboutte had me hooked. The perfect mix of smooth manicured features, natural roots and rocks, and awesome boardwalks over gorgeous rivers kept me entertained and hollering the whole way down.
I won’t describe every single trail in detail, but here’s the summary of my day in Mont-Sainte-Anne:
Lots of climbing (at least for a boy from the flat part of Ontario).
Lots of fun descents.
Lots of challenges (I’ll openly admit that I walked a fair amount of the climbs. I can’t wait to go back and see how I’ve progressed).
Way too many trails for just one day. Next time I am going to go for a week so I can try as many trails as possible as well as rip up the ones I love as many times as possible.
If anyone is looking to go to Mont-Sainte-Anne later this summer, let me know if you have extra room in your car!
About a month ago I picked up the all new CamelBak H.A.W.G LR 20 to help me prepare for some of the longer mountain bike trips I have planned for this year. Here are my first impressions of it.
Buy If: You’re looking for a pack big enough for long adventures, but just as comfortable as a small pack.
Skip If: You only need a small pack. There are many other packs in CamelBak’s range that can fit your needs. Although this can pack down fairly small, it is definitely overkill!
The Features
A 3.0L Low Rider (LR) reservoir that sits low in the pack to keep your centre of weight nice and low.
The reservoir also has a quick link system that allows you to remove it without having to awkwardly pull the hose back through the whole pack.
A dedicated soft pocket to protect your cell phone or sunglasses
A segmented pocket with a tool roll to help keep your tools, food and first aid organised.
A rain cover to help keep your pack dry on rainy rides.
Airfoil back padding to help keep your back cool during long days in the saddle.
Hip straps with small pockets to help keep the weight off your shoulders and hide your favourite snacks in.
The Pros
The Weight
While a 20-litre pack seems like it would be quite the beast to lug around, the H.A.W.G. is surprisingly light once strapped in place. The hip straps are properly placed and padded to help keep the majority of the weight off of your shoulders and to help lock the pack in place over rowdy terrain.
Secure
As mentioned above, the hip straps, in combination with the chest strap, do a phenomenal job of keep the bag perfectly in place over just about any terrain. The straps on the back of the bag are just as helpful, allowing you tighten the bag down so it is only as big as it needs to be.
So many pockets
There are six total separate pockets on this bag, plus multiple dividers to help you stay organised on your rides. The reservoir is located in its own pocket, complete with bands to help keep the hose organised and headed for whichever shoulder you like it on. Next, there is a large pocket that is perfect for storing your rain gear or outer layer in. The middle pocket is my favourite. It features two elasticized smaller pockets and a zippered pocket. I’m currently carrying my first aid kit, snacks, and tools all in separate pockets. Finally, there is a soft pocket at the top to protect your sunglasses.
The best part about all of these pockets is they zip nearly all the way down the bag, allowing you to easily access everything – even the stuff buried at the bottom.
Low Rider Reservoir
I was worried that carrying three litres of water sloshing around on my back would affect my riding, but thanks to the new LR reservoir that isn’t the case. Instead of using the standard long reservoir that runs the length of your back, Camelbak has made a short, wide reservoir that sits right in the middle of your lower back. This change helps keep your centre of gravity low and keeps the weight off of your shoulders.
The reservoir also has a Quicklink system that allows you to connect/disconnect the hose from the reservoir quickly (and without spilling) so you can fill the reservoir without having to re-thread the hose through your pack.
The Little Details
I’ve been using Camelbak products since shortly after I started biking (15 years ago). What sets this bag apart from the rest is the absolute attention to detail that went into the design. From the magnetic hose trap to the small velcro tabs sewn into the ends of straps to keep them tidy, every little detail has been thought of to make this pack as easy to use as possible.
The Cons
Size
There’s no getting around how big this pack actually is. The pack is perfect if you’re looking for a bigger workhorse pack for those long days on the trail. However, if you just need something to carry some water and essentials, there are packs that will fit your needs much better. Check out something like the CamelbakRogue.
Ever since I upgraded my mountain bike, I’ve been toying with the idea of switching to tubeless tires. I’ve always run fairly low pressures with my tubes and surprisingly have never had an issue, so switching to tubeless was more for the insurance factor rather than fixing a problem I faced. The other day I decided to get over my fear and get started. Here is my experience.
What you’ll need
Tubeless Ready Tires
My bike came with a Maxxis Minion DHR front tire and a Maxxis Crossmark II rear tire, both of which are Tubeless ready
Tubeless Conversion Kit OR Sealant and Valves with removable cores
The rims I have were not tubeless ready, so I bought the full conversion kit, which came with:
Two valves with removable cores
Two large rubber gaskets
Two small rubber gaskets
A bottle of sealant
Two alcohol swabs
Rim tape
Soapy water
An air compressor (or some quarters and a local gas station)
The Process
Remove your wheel from your bike and deflate your tube/tire.
Seems obvious right?
Remove your tire and tube
Captain obvious reporting for duty… again
Remove the rim strip
Your rim should have a narrow nylon strip protecting your tube from your spokes. This looks kind of like rim tape, but it is not air-tight. Peel it off of your rims to allow the rim tape to properly seal to your rim
Clean your rim and tire
Make sure you get all the dirt and grime off of your wheel. I used soapy water on both the tire and the rim followed by using the alcohol swab on the inside of the rim
Put a layer of rim tape around the inside channel of your rim
There’s competing ideas around this. Some people say to start at the valve hole, while others say to start at the weld of your rim (directly across from the valve hole). I started at the weld and have not had any issues with it sealing properly.
Either way, you want to put one layer of tape around the entire interior of your rim, removing as many air bubbles as possible, and overlapping by a couple centimetres where you started.
Cut a slit for the valve
Put two small cuts in the tape where the valve hole is to allow the new valve to poke through.
Put in the valve
The valve should have two different sized rubber gaskets that help seal the whole it creates. Place the large gasket between the valve and the inside of the rim, and the small one on the outside of the rim before tightening the nut to hold the valve in place.
Put your tire back on the rim
Take a second to make sure the tire’s bead is nice and clean before popping it back on the rim by hand. *MAKE SURE THE TIRE IS FACING THE RIGHT WAY*
Remove the valve core
Add 4 oz. of sealant
Rotate the tire to get sealant everywhere
Inflate the tire until you hear the bead pop into place
Swirl the tire to allow the sealant to circulate
Enjoy your nice low pressures and added grip!
Tips
Make sure your tire is facing the right way!
I was so proud of myself for getting my tire on and seated on my first try that I failed to notice that I had put it on backwards. If you can’t figure out which direction your tire should face, most tires have a directional arrow printed on the sidewall
Ensure your beads are spotless.
When I tried to reseat the tire I accidentally put on backwards, I forgot to properly clean the sealant that was on the bead. This lead to me wasting about $5 in quarters down at the gas station air compressor wondering why it wouldn’t seat properly. Sure enough, once I cleaned the bead it seated first try!
For that extra clean look, line up the logos of your rim with the logos on your tire.
Hope this newbie’s guide has helped you get your bike one step closer to the perfect bike you’ve always dreamed of! Let me know if you have any tips that have helped you during this process.
The weather here in Southern Ontario can’t quite make up its mind, so mountain biking is off the table for the time being. To help combat the itch to ride trails, my friend Andrew and I made the trek up to Markham, Ontario to check out Joyride 150.
Joyride 150 is a two-wheeled refuge from the harshness of Canadian winter. Housed in a warehouse are a beginner’s skills area, an 800m xc loop, jump lines (beginner, intermediate, advanced, and expert), pump tracks, skinnies, a street plaza, and a vert park. More than enough to entertain both the most beginner and the most advanced riders seeking adrenaline. Check out the video below for a quick lap around the xc loop, pump tracks, and skinnies.
Setting Goals
One of the main reasons why I wanted to check out Joyride 150 was so I could have a controlled environment to build up my bike skills. After a few laps to get my bearings, and check out the whole complex, I spent most of my day whipping around the xc loop and working on my bike handling skills on both the pumptracks and the skinnies.
The skinnies were a great place for me to work on my bike control. There were at least 6 distinct lines, with more than a dozen different transfers and additions that could be made to the lines to keep things interesting. The skinnies had everything from wide boardwalks, to rocks and logs, and even a couple teeter-totters.
The first time I rolled through the skinnies, I noticed this maze of 2-4s that seemed nearly impossible. After a little studying, Andrew pointed out that the wide turns are for your front wheel, while your back wheel follows along on the more straight path. This skinny line became my new goal for the day.
It took a hell of a lot of trust in both my personal abilities and the fact that my bike could even follow through the maze properly, but I had to try it. The biggest thing I was scared that my front wheel would get stuck in a gap and send me tumbling down in front of all the “cool kids” that knew how to ride the whole park perfectly.
This slideshow requires JavaScript.
Progression
The first number of tries ended with me simply dropping a foot before I even got to the part (as usual, the hardest part is the mental game). A few tries later, I was slowly rolling through the first corner, but getting unnerved as soon as I needed to try and pedal through to the next corner. The progression went like this throughout the day, inching closer and closer to completing it. However, in the end, I never quite managed to cleanly ride the entire line. The furthest I managed to get was to the last corner before my rear wheel skidded off and got stuck in the middle of the mess. Happy with my progression for the day, we decided to call it a day, but not before one last stop.
Foam Pit Fun
Andrew getting some jumping advice.
There is no way we were leaving Joyride without at least one of us jumping into the foam pit. Andrew was the lucky one, as he was riding flats and I was riding clips (that’s definitely the only reason I didn’t do it, I swear!). At the risk of ending our friendship… here is the glorious footage of Andrew attempting his first jump into the foam pit. As you can see, it wasn’t the smoothest!
Bottom Line: Should you go?
Hell yeah! It’s a little pricey, but definitely worth the trip to escape from the cold and ride bikes for a day.
The roads are covered in salt and snow, the sun seems to drop behind the horizon even faster than the thermometer, and here I am curled up under blankets letting all my summer gains shrink.
Keeping myself motivated during the winter is probably one of the hardest parts of cycling for me. It takes every fibre of my being to put on my kit and get on the trainer. If you struggle with this as much as I do, here are a few of the things that help me.
1. Put Your Kit On
The hardest part of training for me is turning off Netflix and coming out from the blanket cocoon I’ve formed. However, I’ve found that once I suck it up and put my cycling gear on, I’m a lot more motivated to go get on the trainer. Just be careful, long trainer sessions can wear out kit faster than you might think, so maybe don’t wear that favourite jersey you just got for Christmas!
2. Pick the right playlist
Sure, it can’t beat the sun on your face and the wind at your back, but a good playlist can get you in the mood to put the power to your pedals and put the work in. Look for a mix of decent tempo music with parts that get you stoked. For the best results, use music that is heavy on the bass and can be cranked up to 11 (sorry neighbours). Here is one of the playlists that has helped me.
3. Have a goal
The only thing worse than being stuck inside on a trainer is aimlessly spinning away on your trainer with no end goal. Pick a reasonable goal for your winter training. Maybe it’s to increase your FTP by a certain percentage, or you want to be able to destroy your riding buddies in the town sign sprints, or maybe you just want to be able to make it to the coffee shop without feeling like your lungs are going to explode.
As all my professors have drilled into my head, ensure that your goals are SMART goals. Make them Specific, Measurable, Attainable, Relevant, and Timely goals. For example, don’t just say that your goal is simply to have a higher FTP. Instead set a goal of increasing your FTP by 5% by June 1st.
4. Quality Time With Your Bike
Spending some quality time with your bike, but off of it. Maybe you need to replace your chain, put new grip tape on, or want to learn how to properly index your gears. It seems a little convoluted, but spending time with your bike, in general, will remind you why you got into cycling in the first place. Plus, you’ll emerge in the spring with a cleaner, quieter, more efficient bike!
5. Give yourself rewards
Who doesn’t love treating themselves every once and a while? Sometimes a shiny new piece of kit or tech is exactly what you need to get you back on the bike. Have you been eying up a shiny new heart rate monitor? A power meter? A new pair of shorts? Hell, even just a box of your favourite bars or gels could be just the thing you need to regain your motivation.
Finally, don’t be too hard on yourself if the goal that you set for yourself doesn’t come to fruition. It sucks to not achieve a goal that you have set for yourself, but the reality is that it sometimes won’t work out.
I hope these tips might have helped someone else out there who is sick and tired of the cold and snow getting in the way of their riding. Don’t worry, summer will be here soon enough.
Most people that have had more than a five-minute conversation with me would probably tell you that I’m absolutely obsessed with cycling. Hell, a quick scroll through any of my social media accounts betrays how deep bikes have infiltrated my life. If it has two wheels and is pedal powered, I’m happy.
So, the question is this: “Why Cycling?” Well, there are two answers. If you don’t want to read a whole blog post of me ranting and raving about how much cycling has changed my life and how much it means to me, here’s the simple answer: Everyone needs a passion in life, mine just happens to be cycling. Keep reading if you want to know the full cheesy answer.
Focus
Over the last few years, I’ve struggled with varying degrees of anxiety and depression. The one thing that has helped the most is cycling. Cycling takes the bundle of nerves and energy that I can turn into and gives me something to focus on.
When I’m out on a bike, the only thing left in my head is a sense of calm focus on my pedalling, my breath, and enjoying the sights and sounds of where I may be riding. No matter what is in my head, getting out to ride helps distill it down to the most basic parts. After a ride, I feel much more relaxed and able to face the other aspects of my life. I’m a firm believer in Cycology!
Discovery
One of the best things about cycling is being able to explore new places and discover new things. While I haven’t had the chance to go anywhere out of the ordinary yet, cycling has helped me to discover the hidden little corners of Ontario that normally I would speed past if I were in a car.
Taking time to slow down and observe the world from another perspective is amazing. There is nothing greater than some of the sunsets, sunrises, meadows, and wildlife I’ve been lucky enough to witness.
Community
Last season, I signed up for my local cycling club. I was pretty nervous showing up for my first group ride. Coming from a mountain biking background I was worried about the stereotype that road bikers are elitist and reluctant to put up with newbies. Instead, I was welcomed by a group of some of the kindest people I’ve ever shared a road with. They were eager to share their passion for cycling with new people and took the time to explain every aspect of the sport at a speed that everyone was comfortable. I went from dreading the first Wednesday night group ride, to counting down the days until the next time I ‘d be in a rotating pace line.
Conclusion
I guess that what I’m trying to say with all this longwinded talk about cycling is; it’s important to find your passion. Whether it’s cycling, running, sewing, drawing, or anything else, if you can find the thing that gets you out of bed in the morning, everything else will fall into place. I promise.
If there is one thing that confused me most about my bikes at first, it was how the rear derailleur works. Let’s shine some light on this mysterious piece of tech, shall we?
What do all these screws do?
On first glance, the derailleur is this mysterious piece of metal with screws sticking out of it all over. For basic maintenance, you really only need to know two of them. Let’s break down what each of them controls!
High Limit Screw
Usually marked with an H, this screw controls how far away from the wheel the derailleur can go. Turning it counter-clockwise pushes the derailleur further out while turning it clockwise allows the derailleur to rest closer to the wheel.
Low Limit Screw
Usually marked with an L, the low limit screw controls how close the derailleur can get to the wheel. If it pulls too close to the wheel, it can pull the chain off the inside. This can lead to a lot of cursing in frustration as you wrestle it out, or worse, broken spokes. Turning it counter-clockwise pushes the derailleur further out while turning it clockwise allows the derailleur to rest closer to the wheel.
Adjusting your cable tension
Seems simple right? Well, it is and it isn’t. There are actually two parts that can adjust your cable tension. The first, most obvious, is used to make large adjustments. To adjust this: shift into your highest gear, loosen the screw that clamps the cable, pull the cable finger tight, and retighten the screw!
The second way is using the barrel adjuster, which will generally be located on your front shifter or directly attached to your derailleur. The barrel adjuster is used to make small adjustments to your cable tension, mainly during indexing, which we will get into next time.
Tune in next time, when we take a closer look at how to use all of this to ensure your shifting remains buttery smooth!


 start at the valve hole, while others say to start at the weld of your rim (directly across from the valve hole). I started at the weld and have not had any issues with it sealing properly.

